Learn more about the MQTT protocol and the broker itself.

Last Christmas I was introduced to the ITKO project, which constructs from 4 stages and it’s main goal is to produce a way to analyse IoT data with machine learning and artificial intelligence. The first stage is to collect IoT data to our universal platform, which is available over the internet.
Data sources
IoT is all about devices that act like data sources and are capable to process it’s data or send it to somewhere for further analysis. Basically any sensor which is readable digitally is a valid data source. On edge locations these sensors are usually controlled by a master device called gateway or some cloud enthusiasts would say edge device since it’s not something inside the cloud rather on someone else’s premise. Those gateway devices usually then reads the data from the sensor devices and forwards the results to some specific cloud service where the users can access them.
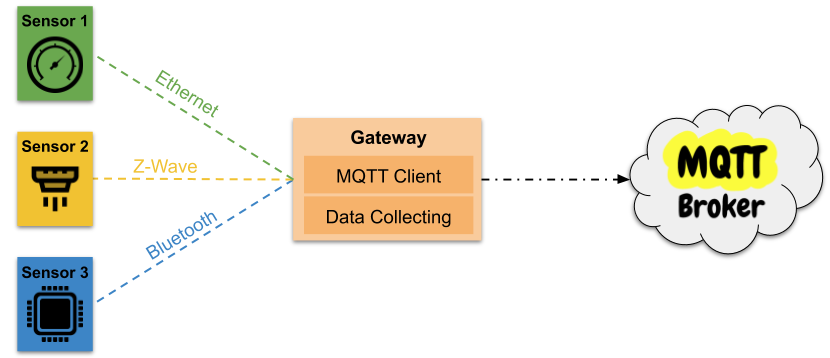
There are plenty of devices on market, which can be used as a gateway. Those gateway devices constructs of some PC hardware and usually lacks a graphical processing unit. One very popular gateway device is Raspberry Pi, since it is cheap, has plenty of input and output capability and is an open system. Gateways usually runs a lightweight OS like a small linux distro or windows embedded.
Whichever IoT gateway you may choose, it seems that they support MQTT protocol at some level. Or at least if the gateway is newer generation. So it seems a viable option for sending data to the cloud, right? Well it depends on the use case, maybe further analysis will help you to understand more.
MQTT in a nutshell
MQTT (Message Queue Telemetry Transport) protocol is usually running on top of TCP/IP and allows bi-directional messaging with publish and subscribe methods. This messaging happens via MQTT broker which listens to any publisher and forwards published messages to all whom have subscribed to the same topic.

MQTT is considered a lightweight protocol, so it is suitable for IoT data. It also packs a lot of options like:
- 3 levels of QoS (Quality of Service)
- LWT (Last Will and Testament)
- KeepAlive
- Properties in MQTT header (MQTT v5)
- Persistent/clean sessions
- Authentication
- Message queueing while offline (persistent session)
- Message retention
This list contains every option that I understood from MQTT-protocol, and is mostly based on HiveMQ’s MQTT Essentials and Mosquitto man page.
MQTT Communication
As we discovered earlier, the MQTT requires a broker and client. Broker is a service that runs on a server and has to have at least one port open, which is by default 1883. Clients are then configured to connect to this with protocol, hostname and port. Yes, protocol can be configured as well.

MQTT is supported over other protocols too. The most interesting one in my opinion is the WS (WebSocket) or WSS (WebSocket Secure). This one is a nice addition to the MQTT protocol, because most of the hosting providers allow only ports 80 and 433 and they usually stick to the default firewall rules. This means, that if we are willing to use MQTT with WS, we should be able to run our MQTT Broker with less hassle with IT-Administration or do anymore firewall configuring (if we have other web services running already).
Secure communication
MQTTS is a secure version of the MQTT-protocol. The “S” stands for “Secure” and is made possible with TLS (Transport Layer Security). Connection establishing to the MQTTS requires the broker to have server certificate generated with CA (Certificate Authority), and clients (gateway or other subscribers) need certificate generated by the same CA. The CA can be self-signed in this situation, which usually means better security.

If I have convinced you now that it is a secure enough approach, we are in a good place, but there is still slightly more to this. As I previously mentioned the WebSockets, it is possible to handle security on the WebSockets level. There is one advantage to this approach I would like to high-light. The connecting devices do not need extra certificates. Communication can be secured within the handshake done with the web-server. This is accomplished by using a trusted CA who signs a certificate to your web-server. There are plenty of those trusted CAs on the sea, and most likely your company has used one to get a certificate, which can be seen from the company’s homepage.
But is this WebSocket Secure approach secure? Well yes and no. With this approach the messages are encrypted, but anyone can now connect to the server and subscribe to any topic. And when anyone subscribes to any topic, they get the messages in a human readable form. I still prefer the WebSocket Secure way, because this problem can be fixed with authentication and the benefits of the WebSockets should win in the end.
Authentication
MQTT supports authenticating users with their credentials (username and password). The MQTT broker then should have a list of user credentials, which it can use to do the authentication for the users connecting. This is a good way to limit access to the MQTT Broker.
This default authentication still does allow any user with credentials to do whatever, and the MQTT broker publishes any message it gets to any subscriber. This is almost okay behavior if the intended use case is within a company and we can be sure that the IoT devices are in safe hands and in WebSocket case no one tries to brute-force username and password.
MQTTS clients can be identified by the certificates, so it doesn’t require the use of credentials. But the approach requires more maintenance on both, client and server-side. MQTTS clients have to have a valid certificate, which has not expired (more secure version requires expiration date). Also servers have to maintain an additional list of certificates that belongs to the user and removing permissions from existing clients can’t be accomplished by removing certificates. Those certificates need to be black listed until they expire which requires additional logic to the system.
MQTT Broker mastery
To get more out of the MQTT protocol and run it boldly over the internet, we want to take full control of the MQTT broker we install to our server. Before selecting any MQTT broker, I want you to see this list where I have collected things that we should be able to control on the broker at the server-side:
- Authentication and authorizing users with custom solutions like RBAC
- Allow x amount of connection attempts (prevent brute-force)
- Control subscriptions based on user’s permissions
- Control publishing based on user’s permissions
- Remove users (MQTTS blacklist certs)
- All above during the run-time
One potential MQTT broker I found was HiveMQ Community Edition. This Java implementation seemed to have necessary API, when looking at the documentation, but requires Java programming skills. There is also MQTT broker Eclipse Mosquitto, which is written in C and has C++ wrapper also. Looking at the man page for configuration, it has ACL (Access Control List) which can be used to control users, but I was not able to figure out if it fills the list above without heavily modifying the source code.

I ended up testing Aedes which is the successor to the MoscaJS and it is using NodeJS as runtime. I think this JavaScript based MQTT broker library is filling those requirements as it has API (Application Programming Interface) with methods that, judging by the method names, are doing all those things on the list. Developers that are experienced with Express or Socket.IO should be able to gain control over the MQTT broker this way.
Server Setup
So far we have only two requirements for our platform. It has to be universal and it has to support MQTT protocol. Universal platform on cloud can be achieved with VPS (Virtual Private Server) and to fully test MQTT protocol I want to open following ports 80, 443, 1883 and 8883.
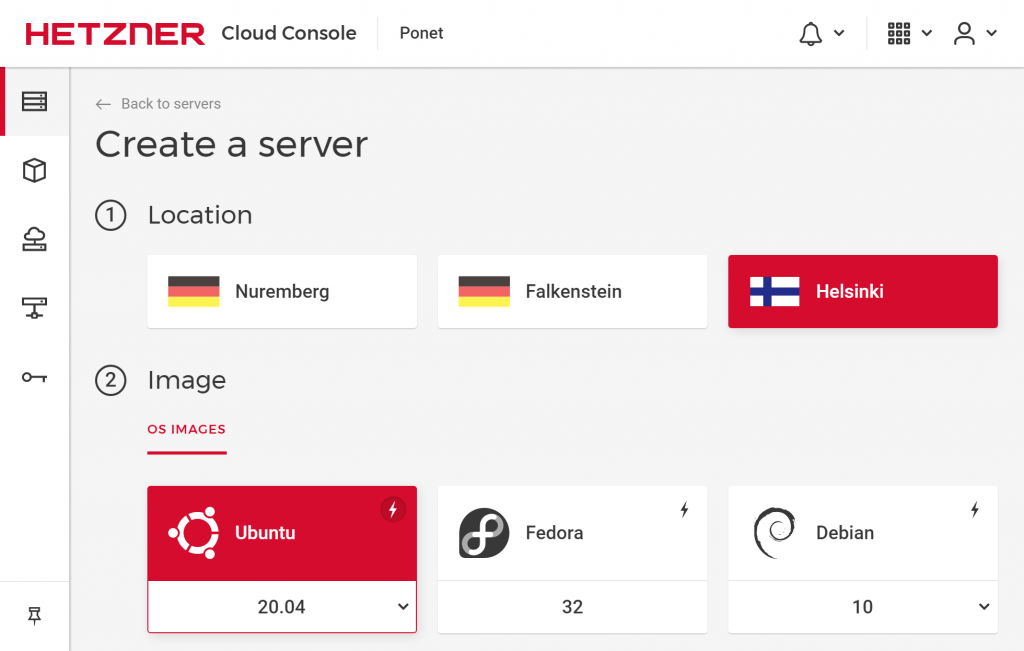
I setup smallest VPS instance on Hetzner:
- vCPU: 1 (Intel Xeon Gold)
- RAM: 2 GB
- Hard Drive: 20 GB SSD (local NVMe)
- Network: 20 TB Data Transfer
- Price: €0.005/h (3.09€/month)
- Location: Helsinki, Finland
- OS: Ubuntu 20.04
After the server setup, I used my domain to create a subdomain (iot.pocloud.fi) and pointed it to the server with A record on the NameCheap FreeDNS service. Assigning domain name to a public IP helps with getting certificates from trusted CAs like Let’s Encrypt. The certificate from trusted CA helps with the WebSocket Secure connection as most devices have a list of trusted CAs and can establish a secure connection that way.
To skip a lot of steps for establishing secure MQTTS, I use this certificate from the Let’s Encrypt on my IoT clients to establish connections to my MQTT broker. It is absolutely a wrong approach and that is why I am not going to go into my test setup details on MQTTS regarding certs. The preferred way to establish a secure connection for MQTTS is to generate a self-signed CA and then use it to sign certificates for your servers and clients.
Installations
For the setup, I installed all the newest updates and then installed following software packages:
- Nginx
- CertBot
- Apache2 (yes, 2x web servers)
- NodeJS 12.16.3
- Mosquitto-clients
I also installed GIT, but it was only so I can save my codes and continue this project.
Server configurations
After installing required packages, I configured firewall, web-servers, certificates and some network setups (DNS).

Here are my commands to the firewall:
# firewall
sudo ufw enable
sudo ufw allow 'Nginx FULL'
sudo ufw allow 1883
sudo ufw allow 8883
With the current setup and these firewall rules, we can now run MQTT messages over the internet with WS, WSS, MQTT and MQTTS default ports. WS and WSS still require web-server configurations(reverse proxy), so MQTT can run under port 80 and 443.
Then I ran certbot and configured my nginx (public facing web-server) to use those certificates and redirect http traffic to https (so WS is now disabled, it’s unsecure anyways).
Commands to acquire a free certificate from Let’s Encrypt.
# creating certificate
sudo systemctl stop nginx.service
sudo certbot --nginx -d iot.pocloud.fi
sudo certbot certonly --standalone # requires web-server to be stopped
Now that we have a certificate, we can configure the web-server. Nginx ships pre-configured, and I basically altered these default settings by changing server name and setting the certificate path (also checked the certbot SSL settings). These setups should be self-evident to anyone with experience, but the interesting setup which I show below, is to configure the reverse proxy to the MQTT broker.
server {
  listen 443 ssl;
  server_name iot.pocloud.fi;

  ssl_certificate     /etc/letsencrypt/live/iot.pocloud.fi/fullchain.pem;
  ssl_certificate_key /etc/letsencrypt/live/iot.pocloud.fi/privkey.pem;
  ssl_protocols       TLSv1 TLSv1.1 TLSv1.2;
  ssl_ciphers         HIGH:!aNULL:!MD5;

  location /mqtt/ {
    proxy_set_header X-Forwarded-For $proxy_add_x_forwarded_for;
    proxy_set_header Host $host;
    proxy_pass https://127.0.0.1:7443/mqtt/;
    proxy_ssl_certificate /etc/letsencrypt/live/iot.pocloud.fi/cert.pem;
    proxy_ssl_certificate_key /etc/letsencrypt/live/iot.pocloud.fi/privkey.pem;
    proxy_http_version 1.1;
    proxy_set_header Upgrade $http_upgrade;
    proxy_set_header Connection "upgrade";
  }
}
This nginx configuration block is a barebone version of the reverse proxy block. Because the 443 (default https port) is already reserved by the web-server, we have to do reverse proxy, which means that we can use nginx as a router and use URL path (wss://iot.pocloud.fi:443/mqtt/) to connect to our MQTT broker that is running inside the server at port 7443. This is a very common practice which helps running other services under the same port (433) and can be used in load-balancing situations as well (WebSockets needs more work when load-balancing).
Creating MQTT broker project
As I mentioned before, I decided to test Aedes for this project. This means that I had to make a NodeJS project.
mkdir mqtt && cd mqtt
npm init
npm install aedes dotenv websocket-stream --save
npm install mqtt --save-dev # javascript mqtt client for testing
touch .gitignore # add node_modules and .env to this file
Now we have initialized the project, here is the project structure in the picture below, which I created. The combo.js is the file, where I implemented all the protocols and tested the Aedes API which can be used to fine-tune the MQTT broker:

I know, it may be a little bit of an overwhelming jump at this point, but hopefully you never thought it is going to be an easy task. This code runs now all four protocols (WS, WSS, MQTT and MQTTS) and has middlewares for the authentication and the authorizing topic subscriptions. Let’s start the service and start testing (sudo was temporary, so it could use the certificates from the root owned directory).

Testing MQTT Broker
Let’s start off by testing MQTT protocol. This protocol testing requires some sort of MQTT client. I installed a ready MQTT client called mosquitto_client. This is a command-line tool, which is operated with params. Below is a picture, where on the left side is a subscriber and on the right side is the publisher sending “hello world” message.

This shows me that the message from the right window was actually published to the MQTT Broker and then the left window (subscriber) received the publish from the broker. Now let’s cover the MQTT-over-WSS in a more fashioned way using GUI. I found this MQTT-over-WSS client tool published by Eclipse. Now with our exposed server, we can actually use different browsers even in a different PC to publish messages and subscribe to their topics. Messages in WSS will be encrypted and the authentication is still required, because I implemented the feature on the broker side. Here is an image of this client tool in action.

Now that we can make connections with this browser, we can subscribe to the topics and publish messages from other PCs.

Summary
MQTT seems like a nice protocol for the IoT data. It is packed with features that are requirements for almost any IoT project and it is fairly mature, thanks to IBM behind this protocol. The expandability with MQTTv5 is also helping newcomers with new ideas to implement this specific protocol and make it even greater.
A full-blown enterprise IoT setup still requires more to this and the skill requirements are also high as the demand now on the IoT markets. To fully cover all IoT data communication, I think there is still demand for the other protocols too, so this is not the only one.
Next steps after successful IoT Communication, we want to look at our data-sources for implementing this protocol and also make some programs on the backend to fully utilize this data now that is available to us. Stay tuned for more.
References
Mosquitto, 2009. Mosquitto Man Page [accessed 16 May 2020]. Available at: https://mosquitto.org/man/mosquitto-8.html
The HiveMQ Team, 2019. MQTT Essentials [accessed 16 May 2020]. Available at: https://www.hivemq.com/tags/mqtt-essentials/
NameCheap, 2020. How can I set up an A address record for my domain [accessed 17 May 2020]. Available at: https://www.namecheap.com/support/knowledgebase/article.aspx/319/2237/how-can-i-set-up-an-a-address-record-for-my-domain
CertBot, 2020. Certbot Instructions: Nginx + Ubuntu 20.04 [accessed 17 May 2020]. Available at: https://certbot.eff.org/lets-encrypt/ubuntufocal-nginx
Steve, 2020. Mosquitto SSL Configuration -MQTT TLS Security [accessed 17 May 2020]. Available at: http://www.steves-internet-guide.com/mosquitto-tls/